Spring Boot干货系列:(九)数据存储篇-SQL关系型数据库之MyBatis的使用

前言

上篇我们介绍了Spring Boot对传统JdbcTemplate的集成,这次换一下,介绍下Spring Boot中如何集成MyBatis。这里分别介绍注解方式以及XML方式的整合。喜欢哪种方式自己选择。

正文

项目框架还是跟上一篇一样使用Spring Boot的ace后端模板,你可以基于它来跟着博主一起来调整代码,如果没看过上一篇,那就下载本篇源码研究吧。

跟上篇一样先添加基础的依赖和数据源。

添加依赖

这里需要添加mybatis-spring-boot-starter依赖跟mysql依赖

1
2
3
4
5
6
7
8
9
10
11
<!--最新版本,匹配spring Boot1.5 or higher-->
<dependency>
<groupId>org.mybatis.spring.boot</groupId>
<artifactId>mybatis-spring-boot-starter</artifactId>
<version>1.3.0</version>
</dependency>

<dependency>
<groupId>mysql</groupId>
<artifactId>mysql-connector-java</artifactId>
</dependency>

这里不引入spring-boot-starter-jdbc依赖,是由于mybatis-spring-boot-starter中已经包含了此依赖。

博主开始整理的时候发现mybatis-spring-boot-starter有新版本了,这里就集成最新的,匹配Spring Boot1.5版本。
img

MyBatis-Spring-Boot-Starter依赖将会提供如下:

  • 自动检测现有的DataSource
  • 将创建并注册SqlSessionFactory的实例,该实例使用SqlSessionFactoryBean将该DataSource作为输入进行传递
  • 将创建并注册从SqlSessionFactory中获取的SqlSessionTemplate的实例。
  • 自动扫描您的mappers,将它们链接到SqlSessionTemplate并将其注册到Spring上下文,以便将它们注入到您的bean中。

就是说,使用了该Starter之后,只需要定义一个DataSource即可(application.properties中可配置),它会自动创建使用该DataSource的SqlSessionFactoryBean以及SqlSessionTemplate。会自动扫描你的Mappers,连接到SqlSessionTemplate,并注册到Spring上下文中。

数据源配置

在src/main/resources/application.properties中配置数据源信息。

1
2
3
4
spring.datasource.url = jdbc:mysql://localhost:3306/spring?useUnicode=true&characterEncoding=utf-8
spring.datasource.username = root
spring.datasource.password = root
spring.datasource.driver-class-name = com.mysql.jdbc.Driver

自定义数据源

Spring Boot默认使用tomcat-jdbc数据源,如果你想使用其他的数据源,比如这里使用了阿里巴巴的数据池管理,除了在application.properties配置数据源之外,你应该额外添加以下依赖:

1
2
3
4
5
<dependency>
<groupId>com.alibaba</groupId>
<artifactId>druid</artifactId>
<version>1.0.19</version>
</dependency>

修改Application.java

1
2
3
4
5
6
7
8
9
10
11
12
13
14
15
16
17
18
19
20
21
22
23
24
25
26
27
28
29
@SpringBootApplication
public class Application {

public static void main(String[] args) {
SpringApplication.run(Application.class, args);
}

@Autowired
private Environment env;

//destroy-method="close"的作用是当数据库连接不使用的时候,就把该连接重新放到数据池中,方便下次使用调用.
@Bean(destroyMethod = "close")
public DataSource dataSource() {
DruidDataSource dataSource = new DruidDataSource();
dataSource.setUrl(env.getProperty("spring.datasource.url"));
dataSource.setUsername(env.getProperty("spring.datasource.username"));//用户名
dataSource.setPassword(env.getProperty("spring.datasource.password"));//密码
dataSource.setDriverClassName(env.getProperty("spring.datasource.driver-class-name"));
dataSource.setInitialSize(2);//初始化时建立物理连接的个数
dataSource.setMaxActive(20);//最大连接池数量
dataSource.setMinIdle(0);//最小连接池数量
dataSource.setMaxWait(60000);//获取连接时最大等待时间,单位毫秒。
dataSource.setValidationQuery("SELECT 1");//用来检测连接是否有效的sql
dataSource.setTestOnBorrow(false);//申请连接时执行validationQuery检测连接是否有效
dataSource.setTestWhileIdle(true);//建议配置为true,不影响性能,并且保证安全性。
dataSource.setPoolPreparedStatements(false);//是否缓存preparedStatement,也就是PSCache
return dataSource;
}
}

ok这样就算自己配置了一个DataSource,Spring Boot会智能地选择我们自己配置的这个DataSource实例。

脚本初始化

1
2
3
4
5
6
7
8
9
10
11
12
13
14
15
16
CREATE DATABASE /*!32312 IF NOT EXISTS*/`spring` /*!40100 DEFAULT CHARACTER SET utf8 */;
USE `spring`;
DROP TABLE IF EXISTS `learn_resource`;

CREATE TABLE `learn_resource` (
`id` bigint(20) NOT NULL AUTO_INCREMENT COMMENT 'ID',
`author` varchar(20) DEFAULT NULL COMMENT '作者',
`title` varchar(100) DEFAULT NULL COMMENT '描述',
`url` varchar(100) DEFAULT NULL COMMENT '地址链接',
PRIMARY KEY (`id`)
) ENGINE=MyISAM AUTO_INCREMENT=1029 DEFAULT CHARSET=utf8;

insert into `learn_resource`(`id`,`author`,`title`,`url`) values (999,'官方SpriongBoot例子','官方SpriongBoot例子','https://github.com/spring-projects/spring-boot/tree/master/spring-boot-samples');
insert into `learn_resource`(`id`,`author`,`title`,`url`) values (1000,'龙果学院','Spring Boot 教程系列学习','http://www.roncoo.com/article/detail/124661');
insert into `learn_resource`(`id`,`author`,`title`,`url`) values (1001,'嘟嘟MD独立博客','Spring Boot干货系列','http://tengj.top/');
insert into `learn_resource`(`id`,`author`,`title`,`url`) values (1002,'后端编程嘟','Spring Boot视频教程','http://www.toutiao.com/m1559096720023553/');

注解方式跟XML配置方式共同的模块编码

不管是注解方式还是XML配置的方式,以下代码模块都是一样的

实体对象

1
2
3
4
5
6
7
public class LearnResouce {
private Long id;
private String author;
private String title;
private String url;
// SET和GET方法
}

Controller层

1
2
3
4
5
6
7
8
9
10
11
12
13
14
15
16
17
18
19
20
21
22
23
24
25
26
27
28
29
30
31
32
33
34
35
36
37
38
39
40
41
42
43
44
45
46
47
48
49
50
51
52
53
54
55
56
57
58
59
60
61
62
63
64
65
66
67
68
69
70
71
72
73
74
75
76
77
78
79
80
81
82
83
84
85
86
87
88
89
90
91
92
93
94
95
96
97
98
99
100
101
102
103
104
105
106
107
108
109
110
111
112
113
114
115
116
117
118
119
120
121
122
123
124
125
126
127
128
129
130
131
132
133
134
135
136
137
138
139
140
141
142
143
144
145
146
/** 教程页面
* Created by tengj on 2017/3/13.
*/
@Controller
@RequestMapping("/learn")
public class LearnController {
@Autowired
private LearnService learnService;
private Logger logger = LoggerFactory.getLogger(this.getClass());

@RequestMapping("")
public String learn(){
return "learn-resource";
}

@RequestMapping(value = "/queryLeanList",method = RequestMethod.POST,produces="application/json;charset=UTF-8")
@ResponseBody
public void queryLearnList(HttpServletRequest request ,HttpServletResponse response){
String page = request.getParameter("page"); // 取得当前页数,注意这是jqgrid自身的参数
String rows = request.getParameter("rows"); // 取得每页显示行数,,注意这是jqgrid自身的参数
String author = request.getParameter("author");
String title = request.getParameter("title");
Map<String,Object> params = new HashMap<String,Object>();
params.put("page", page);
params.put("rows", rows);
params.put("author", author);
params.put("title", title);
List<LearnResouce> learnList=learnService.queryLearnResouceList(params);
PageInfo<LearnResouce> pageInfo =new PageInfo<LearnResouce>(learnList);
JSONObject jo=new JSONObject();
jo.put("rows", learnList);
jo.put("total", pageInfo.getPages());//总页数
jo.put("records",pageInfo.getTotal());//查询出的总记录数
ServletUtil.createSuccessResponse(200, jo, response);
}
/**
* 新添教程
* @param request
* @param response
*/
@RequestMapping(value = "/add",method = RequestMethod.POST)
public void addLearn(HttpServletRequest request , HttpServletResponse response){
JSONObject result=new JSONObject();
String author = request.getParameter("author");
String title = request.getParameter("title");
String url = request.getParameter("url");
if(StringUtil.isNull(author)){
result.put("message","作者不能为空!");
result.put("flag",false);
ServletUtil.createSuccessResponse(200, result, response);
return;
}
if(StringUtil.isNull(title)){
result.put("message","教程名称不能为空!");
result.put("flag",false);
ServletUtil.createSuccessResponse(200, result, response);
return;
}
if(StringUtil.isNull(url)){
result.put("message","地址不能为空!");
result.put("flag",false);
ServletUtil.createSuccessResponse(200, result, response);
return;
}
LearnResouce learnResouce = new LearnResouce();
learnResouce.setAuthor(author);
learnResouce.setTitle(title);
learnResouce.setUrl(url);
int index=learnService.add(learnResouce);
if(index>0){
result.put("message","教程信息添加成功!");
result.put("flag",true);
}else{
result.put("message","教程信息添加失败!");
result.put("flag",false);
}
ServletUtil.createSuccessResponse(200, result, response);
}
/**
* 修改教程
* @param request
* @param response
*/
@RequestMapping(value = "/update",method = RequestMethod.POST)
public void updateLearn(HttpServletRequest request , HttpServletResponse response){
JSONObject result=new JSONObject();
String id = request.getParameter("id");
LearnResouce learnResouce=learnService.queryLearnResouceById(Long.valueOf(id));
String author = request.getParameter("author");
String title = request.getParameter("title");
String url = request.getParameter("url");
if(StringUtil.isNull(author)){
result.put("message","作者不能为空!");
result.put("flag",false);
ServletUtil.createSuccessResponse(200, result, response);
return;
}
if(StringUtil.isNull(title)){
result.put("message","教程名称不能为空!");
result.put("flag",false);
ServletUtil.createSuccessResponse(200, result, response);
return;
}
if(StringUtil.isNull(url)){
result.put("message","地址不能为空!");
result.put("flag",false);
ServletUtil.createSuccessResponse(200, result, response);
return;
}
learnResouce.setAuthor(author);
learnResouce.setTitle(title);
learnResouce.setUrl(url);
int index=learnService.update(learnResouce);
System.out.println("修改结果="+index);
if(index>0){
result.put("message","教程信息修改成功!");
result.put("flag",true);
}else{
result.put("message","教程信息修改失败!");
result.put("flag",false);
}
ServletUtil.createSuccessResponse(200, result, response);
}
/**
* 删除教程
* @param request
* @param response
*/
@RequestMapping(value="/delete",method = RequestMethod.POST)
@ResponseBody
public void deleteUser(HttpServletRequest request ,HttpServletResponse response){
String ids = request.getParameter("ids");
System.out.println("ids==="+ids);
JSONObject result = new JSONObject();
//删除操作
int index = learnService.deleteByIds(ids.split(","));
if(index>0){
result.put("message","教程信息删除成功!");
result.put("flag",true);
}else{
result.put("message","教程信息删除失败!");
result.put("flag",false);
}
ServletUtil.createSuccessResponse(200, result, response);
}
}

Service层

1
2
3
4
5
6
7
8
package com.dudu.service;
public interface LearnService {
int add(LearnResouce learnResouce);
int update(LearnResouce learnResouce);
int deleteByIds(String[] ids);
LearnResouce queryLearnResouceById(Long learnResouce);
List<LearnResouce> queryLearnResouceList(Map<String, Object> params);
}

实现类

1
2
3
4
5
6
7
8
9
10
11
12
13
14
15
16
17
18
19
20
21
22
23
24
25
26
27
28
29
30
31
32
33
34
35
36
package com.dudu.service.impl;

/**
* Created by tengj on 2017/4/7.
*/
@Service
public class LearnServiceImpl implements LearnService {

@Autowired
LearnMapper learnMapper;
@Override
public int add(LearnResouce learnResouce) {
return this.learnMapper.add(learnResouce);
}

@Override
public int update(LearnResouce learnResouce) {
return this.learnMapper.update(learnResouce);
}

@Override
public int deleteByIds(String[] ids) {
return this.learnMapper.deleteByIds(ids);
}

@Override
public LearnResouce queryLearnResouceById(Long id) {
return this.learnMapper.queryLearnResouceById(id);
}

@Override
public List<LearnResouce> queryLearnResouceList(Map<String,Object> params) {
PageHelper.startPage(Integer.parseInt(params.get("page").toString()), Integer.parseInt(params.get("rows").toString()));
return this.learnMapper.queryLearnResouceList(params);
}
}

Mybatis集成

接下来,我们分别来介绍下注解方式以及XML配置方式。

方案一:注解方式

Mybatis注解的方式好简单,只要定义一个dao接口,然后sql语句通过注解写在接口方法上。最后给这个接口添加@Mapper注解或者在启动类上添加@MapperScan(“com.dudu.dao”)注解都行。

如下:

1
2
3
4
5
6
7
8
9
10
11
12
13
14
15
16
17
18
19
20
21
22
23
24
25
26
27
28
29
30
31
32
33
34
35
36
37
38
39
40
41
42
43
44
45
46
47
48
49
50
51
52
53
54
55
56
57
58
59
package com.dudu.dao;
/**
* Created by tengj on 2017/4/22.
* Component注解不添加也没事,只是不加service那边引入LearnMapper会有错误提示,但不影响
*/
@Component
@Mapper
public interface LearnMapper {
@Insert("insert into learn_resource(author, title,url) values(#{author},#{title},#{url})")
int add(LearnResouce learnResouce);

@Update("update learn_resource set author=#{author},title=#{title},url=#{url} where id = #{id}")
int update(LearnResouce learnResouce);

@DeleteProvider(type = LearnSqlBuilder.class, method = "deleteByids")
int deleteByIds(@Param("ids") String[] ids);


@Select("select * from learn_resource where id = #{id}")
@Results(id = "learnMap", value = {
@Result(column = "id", property = "id", javaType = Long.class),
@Result(property = "author", column = "author", javaType = String.class),
@Result(property = "title", column = "title", javaType = String.class)
})
LearnResouce queryLearnResouceById(@Param("id") Long id);

@SelectProvider(type = LearnSqlBuilder.class, method = "queryLearnResouceByParams")
List<LearnResouce> queryLearnResouceList(Map<String, Object> params);

class LearnSqlBuilder {
public String queryLearnResouceByParams(final Map<String, Object> params) {
StringBuffer sql =new StringBuffer();
sql.append("select * from learn_resource where 1=1");
if(!StringUtil.isNull((String)params.get("author"))){
sql.append(" and author like '%").append((String)params.get("author")).append("%'");
}
if(!StringUtil.isNull((String)params.get("title"))){
sql.append(" and title like '%").append((String)params.get("title")).append("%'");
}
System.out.println("查询sql=="+sql.toString());
return sql.toString();
}

//删除的方法
public String deleteByids(@Param("ids") final String[] ids){
StringBuffer sql =new StringBuffer();
sql.append("DELETE FROM learn_resource WHERE id in(");
for (int i=0;i<ids.length;i++){
if(i==ids.length-1){
sql.append(ids[i]);
}else{
sql.append(ids[i]).append(",");
}
}
sql.append(")");
return sql.toString();
}
}
}

需要注意的是,简单的语句只需要使用@Insert、@Update、@Delete、@Select这4个注解即可,但是有些复杂点需要动态SQL语句,就比如上面方法中根据查询条件是否有值来动态添加sql的,就需要使用@InsertProvider、@UpdateProvider、@DeleteProvider、@SelectProvider等注解。

这些可选的 SQL 注解允许你指定一个类名和一个方法在执行时来返回运行 允许创建动态 的 SQL。 基于执行的映射语句, MyBatis 会实例化这个类,然后执行由 provider 指定的方法. 该方法可以有选择地接受参数对象.(In MyBatis 3.4 or later, it’s allow multiple parameters) 属性: type,method。type 属性是类。method 属性是方法名。 注意: 这节之后是对 类的 讨论,它可以帮助你以干净,容于阅读 的方式来构建动态 SQL。

方案二:XML配置方式

xml配置方式保持映射文件的老传统,优化主要体现在不需要实现dao的是实现层,系统会自动根据方法名在映射文件中找对应的sql,具体操作如下:

编写Dao层的代码
新建LearnMapper接口,无需具体实现类。

1
2
3
4
5
6
7
8
9
package com.dudu.dao;
@Mapper
public interface LearnMapper {
int add(LearnResouce learnResouce);
int update(LearnResouce learnResouce);
int deleteByIds(String[] ids);
LearnResouce queryLearnResouceById(Long id);
public List<LearnResouce> queryLearnResouceList(Map<String, Object> params);
}

修改application.properties 配置文件

1
2
3
4
#指定bean所在包
mybatis.type-aliases-package=com.dudu.domain
#指定映射文件
mybatis.mapperLocations=classpath:mapper/*.xml

添加LearnMapper的映射文件
在src/main/resources目录下新建一个mapper目录,在mapper目录下新建LearnMapper.xml文件。

通过mapper标签中的namespace属性指定对应的dao映射,这里指向LearnMapper。

1
2
3
4
5
6
7
8
9
10
11
12
13
14
15
16
17
18
19
20
21
22
23
24
25
26
27
28
29
30
31
32
33
34
35
36
37
38
39
40
41
42
43
44
45
46
47
48
49
50
51
52
<?xml version="1.0" encoding="UTF-8"?>
<!DOCTYPE mapper PUBLIC "-//mybatis.org//DTD Mapper 3.0//EN" "http://mybatis.org/dtd/mybatis-3-mapper.dtd">
<mapper namespace="com.dudu.dao.LearnMapper">
<resultMap id="baseResultMap" type="com.dudu.domain.LearnResouce">
<id column="id" property="id" jdbcType="BIGINT" />
<result column="author" property="author" jdbcType="VARCHAR"/>
<result column="title" property="title" jdbcType="VARCHAR"/>
<result column="url" property="url" jdbcType="VARCHAR"/>
</resultMap>

<sql id="baseColumnList" >
id, author, title,url
</sql>

<select id="queryLearnResouceList" resultMap="baseResultMap" parameterType="java.util.HashMap">
select
<include refid="baseColumnList" />
from learn_resource
<where>
1 = 1
<if test="author!= null and author !=''">
AND author like CONCAT(CONCAT('%',#{author,jdbcType=VARCHAR}),'%')
</if>
<if test="title != null and title !=''">
AND title like CONCAT(CONCAT('%',#{title,jdbcType=VARCHAR}),'%')
</if>

</where>
</select>

<select id="queryLearnResouceById" resultMap="baseResultMap" parameterType="java.lang.Long">
SELECT
<include refid="baseColumnList" />
FROM learn_resource
WHERE id = #{id}
</select>

<insert id="add" parameterType="com.dudu.domain.LearnResouce" >
INSERT INTO learn_resource (author, title,url) VALUES (#{author}, #{title}, #{url})
</insert>

<update id="update" parameterType="com.dudu.domain.LearnResouce" >
UPDATE learn_resource SET author = #{author},title = #{title},url = #{url} WHERE id = #{id}
</update>

<delete id="deleteByIds" parameterType="java.lang.String" >
DELETE FROM learn_resource WHERE id in
<foreach item="idItem" collection="array" open="(" separator="," close=")">
#{idItem}
</foreach>
</delete>
</mapper>

更多mybatis数据访问操作的使用请参考:mybatis官方中文参考文档

分页插件

上面我有使用到物理分页插件pagehelper,用法还算简单,配置如下
pom.xml中添加依赖

1
2
3
4
5
<dependency>
<groupId>com.github.pagehelper</groupId>
<artifactId>pagehelper-spring-boot-starter</artifactId>
<version>1.1.0</version>
</dependency>

然后你只需在查询list之前使用PageHelper.startPage(int pageNum, int pageSize)方法即可。pageNum是第几页,pageSize是每页多少条。

1
2
3
4
5
@Override
public List<LearnResouce> queryLearnResouceList(Map<String,Object> params) {
PageHelper.startPage(Integer.parseInt(params.get("page").toString()), Integer.parseInt(params.get("rows").toString()));
return this.learnMapper.queryLearnResouceList(params);
}

分页插件PageHelper项目地址: https://github.com/pagehelper/Mybatis-PageHelper

最终项目效果如下,增删改查分页一个都不少:
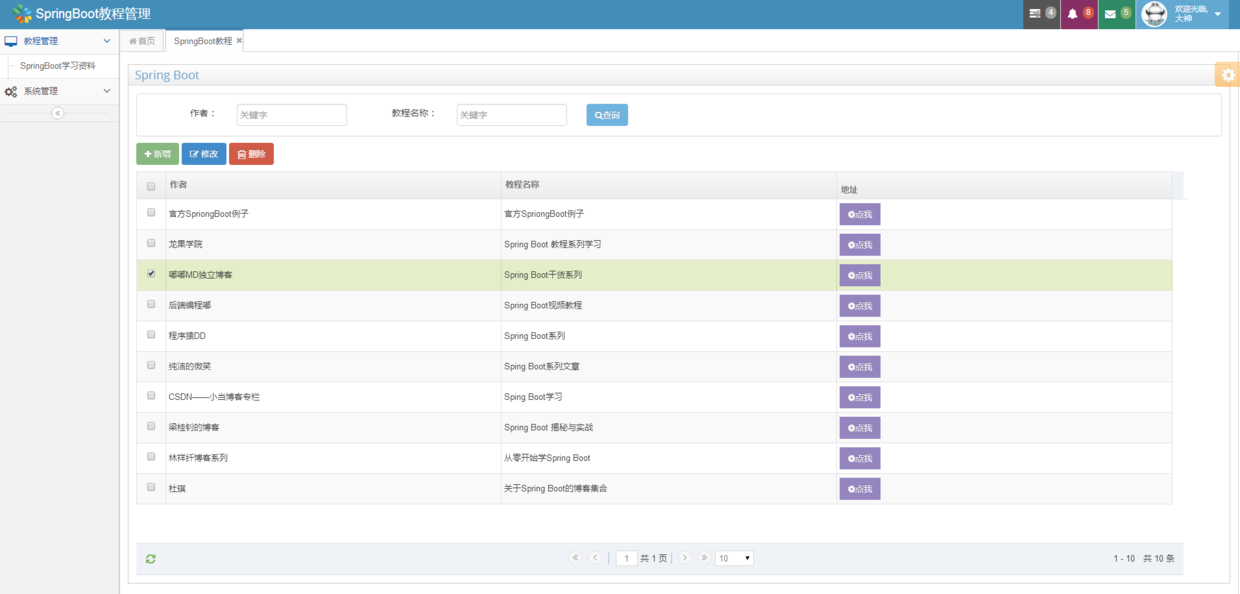
img

总结

到此为止,Spring Boot与Mybatis的初步整合就完成了,项目不仅整合了bootstrap模板框架,还包含了登录、拦截器、日志框架logback等前面介绍的功能。麻雀虽小,五脏俱全。

想要查看更多Spring Boot干货教程,可前往:Spring Boot干货系列总纲

源码下载

( ̄︶ ̄)↗[相关示例完整代码]

  • chapter9==》Spring Boot干货系列:(九)数据存储篇-SQL关系型数据库之MyBatis-注解方式
  • chapter9-2==》Spring Boot干货系列:(九)数据存储篇-SQL关系型数据库之MyBatis-XML配置方式

想要ace模板源码的话,在博主公众号回复关键字:ace

一直觉得自己写的不是技术,而是情怀,一篇篇文章是自己这一路走来的痕迹。靠专业技能的成功是最具可复制性的,希望我的这条路能让你少走弯路,希望我能帮你抹去知识的蒙尘,希望我能帮你理清知识的脉络,希望未来技术之巅上有你也有我,希望大爷你看完打赏点零花钱给我。

#

订阅博主微信公众号:嘟爷java超神学堂(java2Learn)三大好处:

  • 获取最新博主博客更新信息,首发公众号
  • 获取大量视频,电子书,精品破解软件资源
  • 可以跟博主聊天,欢迎程序媛妹妹来撩我
文章目录
  1. 1. 前言
  2. 2. 正文
    1. 2.1. 添加依赖
    2. 2.2. 数据源配置
    3. 2.3. 自定义数据源
    4. 2.4. 脚本初始化
    5. 2.5. 注解方式跟XML配置方式共同的模块编码
      1. 2.5.1. 实体对象
      2. 2.5.2. Controller层
      3. 2.5.3. Service层
    6. 2.6. Mybatis集成
      1. 2.6.1. 方案一:注解方式
      2. 2.6.2. 方案二:XML配置方式
    7. 2.7. 分页插件
  3. 3. 总结
  4. 4. 源码下载