前言
今天来介绍下ArrayList,在集合框架整体框架一章中,我们介绍了List接口,LinkedList与ArrayList一样实现List接口,只是ArrayList是List接口的大小可变数组的实现,LinkedList是List接口链表的实现。基于链表实现的方式使得LinkedList在插入和删除时更优于ArrayList,而随机访问则比ArrayList逊色些。
构造图如下:
蓝色线条:继承
绿色线条:接口实现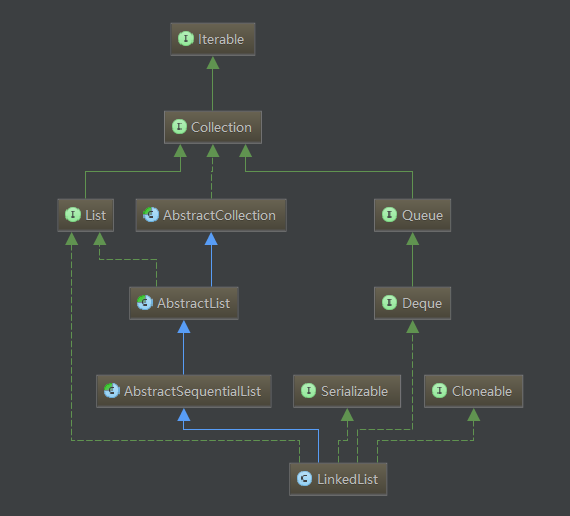
正文
LinkedList是基于链表结构的一种List,在分析LinkedList源码前有必要对链表结构进行说明。
1.链表的概念
链表是由一系列非连续的节点组成的存储结构,简单分下类的话,链表又分为单向链表和双向链表,而单向/双向链表又可以分为循环链表和非循环链表,下面简单就这四种链表进行图解说明。
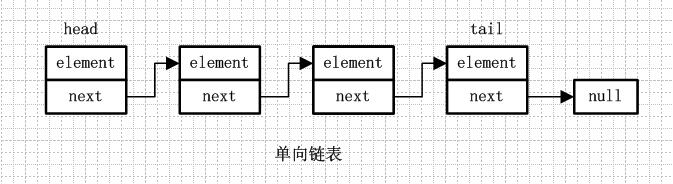
1.1.单向链表
单向链表就是通过每个结点的指针指向下一个结点从而链接起来的结构,最后一个节点的next指向null。
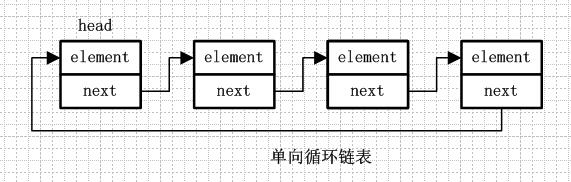
1.2.单向循环链表
单向循环链表和单向列表的不同是,最后一个节点的next不是指向null,而是指向head节点,形成一个“环”。
1.3.双向链表
从名字就可以看出,双向链表是包含两个指针的,pre指向前一个节点,next指向后一个节点,但是第一个节点head的pre指向null,最后一个节点的tail指向null。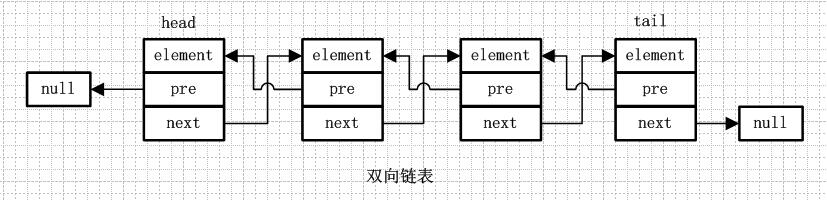
1.4.双向循环链表
双向循环链表和双向链表的不同在于,第一个节点的pre指向最后一个节点,最后一个节点的next指向第一个节点,也形成一个“环”。而LinkedList就是基于双向循环链表设计的。
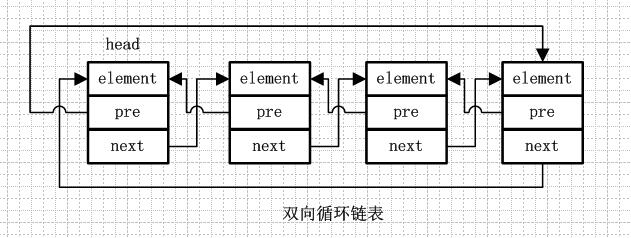
更形象的解释下就是:双向循环链表就像一群小孩手牵手围成一个圈,第一个小孩的右手拉着第二个小孩的左手,第二个小孩的左手拉着第一个小孩的右手。。。最后一个小孩的右手拉着第一个小孩的左手。
ok,链表的概念介绍完了,下面进入写注释和源码分析部分,但是在这之前还是要提醒一句,不是啰嗦哦,链表操作理解起来比数组困难了不少,所以务必要理解上面的图解,如果源码解析过程中遇到理解困难,请返回来照图理解。
LinkedList简介
LinkedList定义
1 | public class LinkedList<E> |
LinkedList 是一个继承于AbstractSequentialList的双向循环链表。它也可以被当作堆栈、队列或双端队列进行操作。
LinkedList 实现 List 接口,能对它进行队列操作。
LinkedList 实现 Deque 接口,即能将LinkedList当作双端队列使用。
LinkedList 实现了Cloneable接口,即覆盖了函数clone(),能克隆。
LinkedList 实现java.io.Serializable接口,这意味着LinkedList支持序列化,能通过序列化去传输。
LinkedList 是非同步的。
LinkedList属性
明白了上面的链表概念,以及LinkedList是基于双向循环链表设计的,下面在具体来看看LinkedList的底层的属性1
2private transient Entry<E> header = new Entry<E>(null, null, null);
2 private transient int size = 0;
LinkedList中提供了上面两个属性,其中size和ArrayList中一样用来计数,表示list的元素数量,而header则是链表的头结点,Entry则是链表的节点对象。1
2
3
4
5
6
7
8
9
10private static class Entry<E> {
E element; // 当前存储元素
Entry<E> next; // 下一个元素节点
Entry<E> previous; // 上一个元素节点
Entry(E element, Entry<E> next, Entry<E> previous) {
this.element = element;
this.next = next;
this.previous = previous;
}
}
Entry为LinkedList 的内部类,其中定义了当前存储的元素,以及该元素的上一个元素和下一个元素。结合上面双向链表的示意图很容易看懂。
LinkedList构造函数
1 | /** |
需要注意的是空的LinkedList构造方法,它将header节点的前一节点和后一节点都设置为自身,这里便说明LinkedList 是一个双向循环链表,如果只是单存的双向链表而不是循环链表,他的实现应该是这样的:1
2
3
4public LinkedList() {
header.next = null;
header. previous = null;
}
非循环链表的情况应该是header节点的前一节点和后一节点均为null(参见链表图解)。
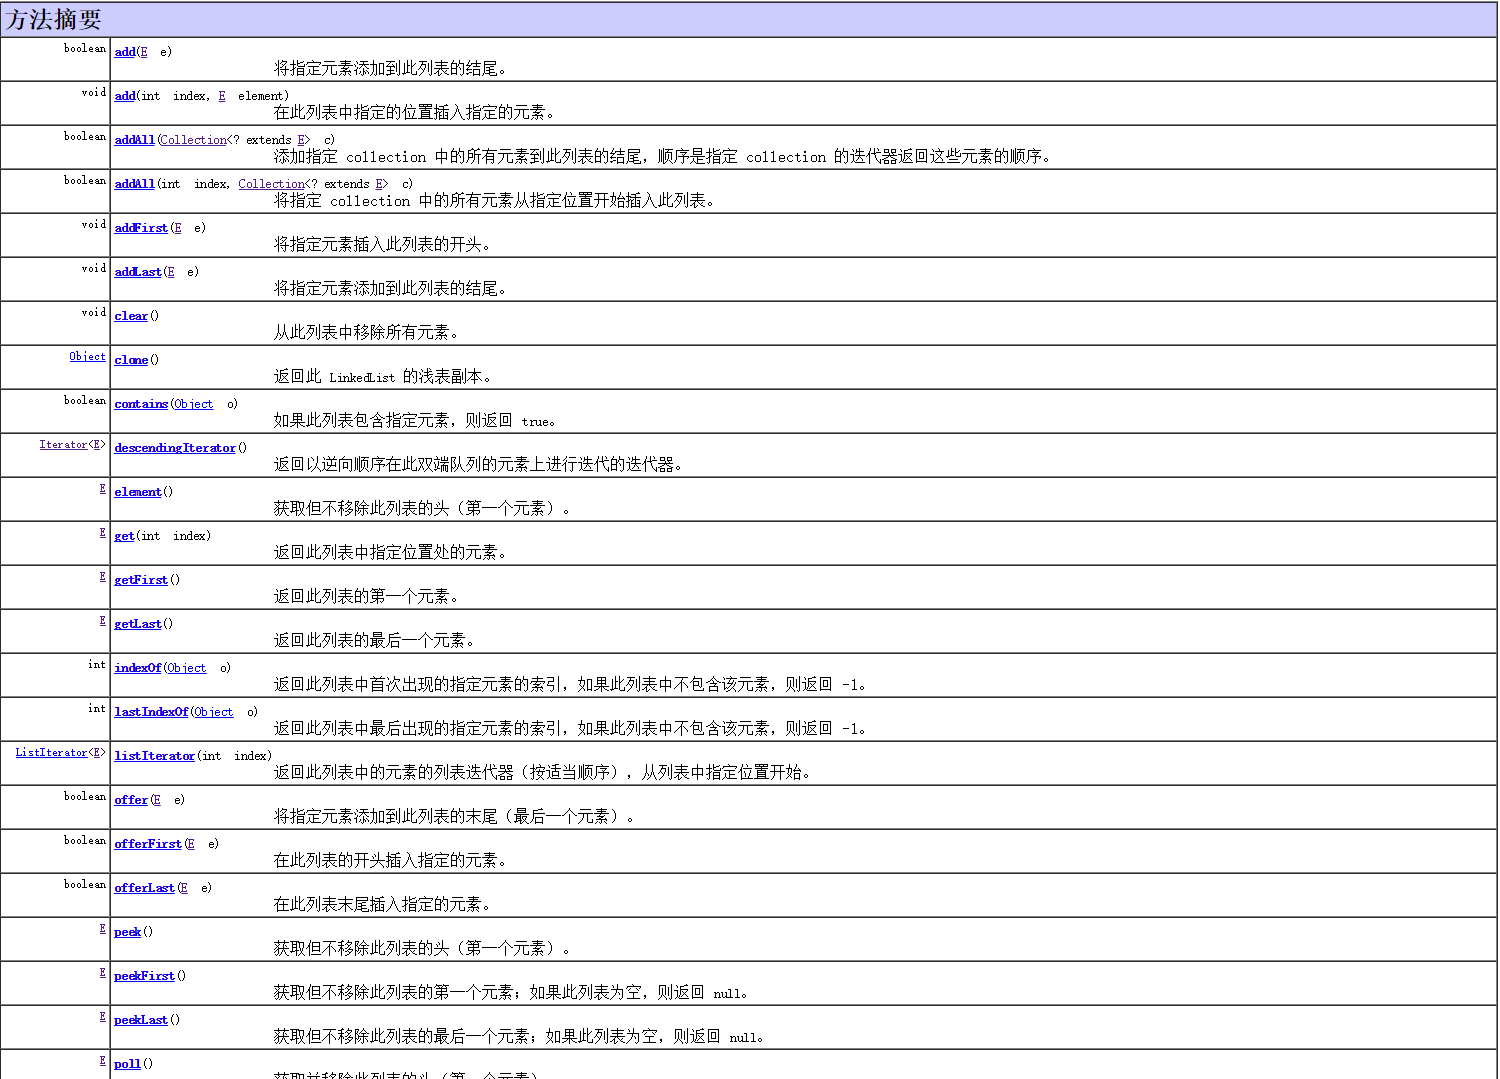
API方法摘要

LinkedList源码解析(基于JDK1.6.0_45)
增加
增加方法的代码读起来比较不容易理解,需要的时候请结合链表图解。1
2
3
4
5
6
7
8
9
10
11
12
13
14
15
16
17
18
19
20
21
22
23
24
25
26
27
28
29/**
* 将一个元素添加至list尾部
*/
public boolean add(E e) {
// 在header前添加元素e,header前就是最后一个结点啦,就是在最后一个结点的后面添加元素e
addBefore(e, header);
return true;
}
/**
* 在指定位置添加元素
*/
public void add(int index, E element) {
// 如果index等于list元素个数,则在队尾添加元素(header之前),否则在index节点前添加元素
addBefore(element, (index== size ? header : entry(index)));
}
private Entry<E> addBefore(E e, Entry<E> entry) {
// 用entry创建一个要添加的新节点,next为entry,previous为entry.previous,意思就是新节点插入entry前面,确定自身的前后引用,
Entry<E> newEntry = new Entry<E>(e, entry, entry.previous);
// 下面修改newEntry的前后节点的引用,确保其链表的引用关系是正确的
// 将上一个节点的next指向自己
newEntry. previous.next = newEntry;
// 将下一个节点的previous指向自己
newEntry. next.previous = newEntry;
// 计数+1
size++;
modCount++;
return newEntry;
}
到这里可以发现一点疑虑,header作为双向循环链表的头结点是不保存数据的,也就是说hedaer中的element永远等于null。1
2
3
4
5
6
7
8
9
10
11
12
13
14
15
16
17
18
19
20
21
22
23
24
25
26
27
28
29
30
31
32
33
34
35
36
37
38
39
40
41
42
43
44/**
* 添加一个集合元素到list中
*/
public boolean addAll(Collection<? extends E> c) {
// 将集合元素添加到list最后的尾部
return addAll(size , c);
}
/**
* 在指定位置添加一个集合元素到list中
*/
public boolean addAll(int index, Collection<? extends E> c) {
// 越界检查
if (index < 0 || index > size)
throw new IndexOutOfBoundsException( "Index: "+index+
", Size: "+size );
Object[] a = c.toArray();
// 要插入元素的个数
int numNew = a.length ;
if (numNew==0)
return false;
modCount++;
// 找出要插入元素的前后节点
// 获取要插入index位置的下一个节点,如果index正好是lsit尾部的位置那么下一个节点就是header,否则需要查找index位置的节点
Entry<E> successor = (index== size ? header : entry(index));
// 获取要插入index位置的上一个节点,因为是插入,所以上一个点击就是未插入前下一个节点的上一个
Entry<E> predecessor = successor. previous;
// 循环插入
for (int i=0; i<numNew; i++) {
// 构造一个节点,确认自身的前后引用
Entry<E> e = new Entry<E>((E)a[i], successor, predecessor);
// 将插入位置上一个节点的下一个元素引用指向当前元素(这里不修改下一个节点的上一个元素引用,是因为下一个节点随着循环一直在变)
predecessor. next = e;
// 最后修改插入位置的上一个节点为自身,这里主要是为了下次遍历后续元素插入在当前节点的后面,确保这些元素本身的顺序
predecessor = e;
}
// 遍历完所有元素,最后修改下一个节点的上一个元素引用为遍历的最后一个元素
successor. previous = predecessor;
// 修改计数器
size += numNew;
return true;
}

增加方法的代码理解起来可能有些困难,但是只要理解了双向链表的存储结构,掌握增加的核心逻辑就可以了,这里总结一下往链表中增加元素的核心逻辑:1.将元素转换为链表节点,2.增加该节点的前后引用(即pre和next分别指向哪一个节点),3.前后节点对该节点的引用(前节点的next指向该节点,后节点的pre指向该节点)。现在再看下就这么简单么,就是改变前后的互相指向关系(看图增加元素前后的变化)。
其实删除也是一样的对不对?下面看看删除方法的实现。
删除
1 | /** |
上面对于链表增加元素总结了,一句话就是“改变前后的互相指向关系”,删除也是同样的道理,由于节点被删除,该节点的上一个节点和下一个节点互相拉一下小手就可以了,注意的是“互相”,不能一厢情愿。
修改
1 | /** |
set方法看起来简单了很多,只要修改该节点上的元素就好了,但是不要忽略了这里的entry()方法,重点就是它。
查询
终于到查询了,终于发现了上面经常出现的那个方法entry()根据index查询节点,我们知道数组是有下标的,通过下标操作天然的支持根据index查询元素,而链表中是没有index概念呢,那么怎么样才能通过index查询到对应的元素呢,下面就来看看LinkedList是怎么实现的。1
2
3
4
5
6
7
8
9
10
11
12
13
14
15
16
17
18
19
20
21
22
23
24
25
26
27
28
29/**
* 查找指定索引位置的元素
*/
public E get( int index) {
return entry(index).element ;
}
/**
* 返回指定索引位置的节点
*/
private Entry<E> entry( int index) {
// 越界检查
if (index < 0 || index >= size)
throw new IndexOutOfBoundsException( "Index: "+index+
", Size: "+size );
// 取出头结点
Entry<E> e = header;
// size>>1右移一位代表除以2,这里使用简单的二分方法,判断index与list的中间位置的距离
if (index < (size >> 1)) {
// 如果index距离list中间位置较近,则从头部向后遍历(next)
for (int i = 0; i <= index; i++)
e = e. next;
} else {
// 如果index距离list中间位置较远,则从头部向前遍历(previous)
for (int i = size; i > index; i--)
e = e. previous;
}
return e;
}
现在知道了,LinkedList是通过从header开始index计为0,然后一直往下遍历(next),直到到底index位置。为了优化查询效率,LinkedList采用了二分查找(这里说的二分只是简单的一次二分),判断index与size中间位置的距离,采取从header向后还是向前查找。
到这里我们明白,基于双向循环链表实现的LinkedList,通过索引Index的操作时低效的,index所对应的元素越靠近中间所费时间越长。而向链表两端插入和删除元素则是非常高效的(如果不是两端的话,都需要对链表进行遍历查找)。
是否包含
1 | // 判断LinkedList是否包含元素(o) |
和public boolean remove(Object o) 一样,indexOf查询元素位于容器的索引位置,都是需要对链表进行遍历操作,当然也就是低效了啦。
判断容量
1 | /** |
和ArrayList一样,基于计数器size操作,容量判断很方便。
到这里LinkedList就分析完了,不对好像还差些什么对不对?是什么呢,就是最开始说的Deque双端队列,明白了链表原理和LinkedList的基本crud操作,Deque的LinkedList实现就已经是so easy了,我们简单看下。
LinkedList实现的Deque双端队列
1 | /** |
看看Deque 的实现是不是很简单,逻辑都是基于上面讲的链表操作的,对于队列的一些概念我不打算在这里讲,是因为后面队列会单独拿出来分析啦,这里只要理解基于链表实现的list内部是怎么操作的就可以啦。
总结:
(01) LinkedList 实际上是通过双向链表去实现的。
它包含一个非常重要的内部类:Entry。Entry是双向链表节点所对应的数据结构,它包括的属性有:当前节点所包含的值,上一个节点,下一个节点。
(02) 从LinkedList的实现方式中可以发现,它不存在LinkedList容量不足的问题。
(03) LinkedList的克隆函数,即是将全部元素克隆到一个新的LinkedList对象中。
(04) LinkedList实现java.io.Serializable。当写入到输出流时,先写入“容量”,再依次写入“每一个节点保护的值”;当读出输入流时,先读取“容量”,再依次读取“每一个元素”。
(05) 由于LinkedList实现了Deque,而Deque接口定义了在双端队列两端访问元素的方法。提供插入、移除和检查元素的方法。每种方法都存在两种形式:一种形式在操作失败时抛出异常,另一种形式返回一个特殊值(null 或 false,具体取决于操作)。
对LinkedList以及ArrayList的迭代效率比较
先说结论:ArrayList使用最普通的for循环遍历比较快,LinkedList使用foreach循环比较快。
看一下两个List的定义:1
2public class ArrayList<E> extends AbstractList<E>
implements List<E>, RandomAccess, Cloneable, java.io.Serializable
1 | public class LinkedList<E> |
注意到ArrayList是实现了RandomAccess接口而LinkedList则没有实现这个接口,关于RandomAccess这个接口的作用,看一下JDK API上的说法:
为此,我写一段代码证明一下这一点,注意,虽然上面的例子用的Iterator,但是做foreach循环的时候,编译器默认会使用这个集合的Iterator。测试代码如下:1
2
3
4
5
6
7
8
9
10
11
12
13
14
15
16
17
18
19
20
21
22
23
24
25
26
27
28
29
30
31
32
33
34
35
36
37
38
39public class TestMain
{
private static int SIZE = 111111;
private static void loopList(List<Integer> list)
{
long startTime = System.currentTimeMillis();
for (int i = 0; i < list.size(); i++)
{
list.get(i);
}
System.out.println(list.getClass().getSimpleName() + "使用普通for循环遍历时间为" +
(System.currentTimeMillis() - startTime) + "ms");
startTime = System.currentTimeMillis();
for (Integer i : list)
{
}
System.out.println(list.getClass().getSimpleName() + "使用foreach循环遍历时间为" +
(System.currentTimeMillis() - startTime) + "ms");
}
public static void main(String[] args)
{
List<Integer> arrayList = new ArrayList<Integer>(SIZE);
List<Integer> linkedList = new LinkedList<Integer>();
for (int i = 0; i < SIZE; i++)
{
arrayList.add(i);
linkedList.add(i);
}
loopList(arrayList);
loopList(linkedList);
System.out.println();
}
}
我截取三次运行结果:1
2
3
4ArrayList使用普通for循环遍历时间为10ms
ArrayList使用foreach循环遍历时间为36ms
LinkedList使用普通for循环遍历时间为21841ms
LinkedList使用foreach循环遍历时间为34ms
1 | ArrayList使用普通for循环遍历时间为11ms |
1 | ArrayList使用普通for循环遍历时间为10ms |
有了JDK API的解释,这个结果并不让人感到意外,最最想要提出的一点是:如果使用普通for循环遍历LinkedList,其遍历速度将慢得令人发指。
总结
ArrayList和LinkedList的比较
1、顺序插入速度ArrayList会比较快,因为ArrayList是基于数组实现的,数组是事先new好的,只要往指定位置塞一个数据就好了;LinkedList则不同,每次顺序插入的时候LinkedList将new一个对象出来,如果对象比较大,那么new的时间势必会长一点,再加上一些引用赋值的操作,所以顺序插入LinkedList必然慢于ArrayList
2、基于上一点,因为LinkedList里面不仅维护了待插入的元素,还维护了Entry的前置Entry和后继Entry,如果一个LinkedList中的Entry非常多,那么LinkedList将比ArrayList更耗费一些内存
3、数据遍历的速度,看最后一部分,这里就不细讲了,结论是:使用各自遍历效率最高的方式,ArrayList的遍历效率会比LinkedList的遍历效率高一些
4、有些说法认为LinkedList做插入和删除更快,这种说法其实是不准确的:
(1)LinkedList做插入、删除的时候,慢在寻址,快在只需要改变前后Entry的引用地址
(2)ArrayList做插入、删除的时候,慢在数组元素的批量copy,快在寻址
所以,如果待插入、删除的元素是在数据结构的前半段尤其是非常靠前的位置的时候,LinkedList的效率将大大快过ArrayList,因为ArrayList将批量copy大量的元素;越往后,对于LinkedList来说,因为它是双向链表,所以在第2个元素后面插入一个数据和在倒数第2个元素后面插入一个元素在效率上基本没有差别,但是ArrayList由于要批量copy的元素越来越少,操作速度必然追上乃至超过LinkedList。
从这个分析看出,如果你十分确定你插入、删除的元素是在前半段,那么就使用LinkedList;如果你十分确定你删除、删除的元素在比较靠后的位置,那么可以考虑使用ArrayList。如果你不能确定你要做的插入、删除是在哪儿呢?那还是建议你使用LinkedList吧,因为一来LinkedList整体插入、删除的执行效率比较稳定,没有ArrayList这种越往后越快的情况;二来插入元素的时候,弄得不好ArrayList就要进行一次扩容,记住,ArrayList底层数组扩容是一个既消耗时间又消耗空间的操作。
参考
该文为本人学习的笔记,参考网上各大帖子,取其精华整合自己的理解而成。集合框架源码面试经常会问,所以解读源码十分必要,希望对你有用。
java提高篇(二)—LinkedList
Java 集合系列05之 LinkedList详细介绍(源码解析)和使用示例
图解集合2:LinkedList
给jdk写注释系列之jdk1.6容器(2)-LinkedList源码解析
整理的集合框架思维导图
个人整理的Java集合框架思维导图,动态维护。导出的图片无法查看备注的一些信息,所以需要源文件的童鞋可以关注我个人主页上的公众号,回复Java集合框架即可获取源文件。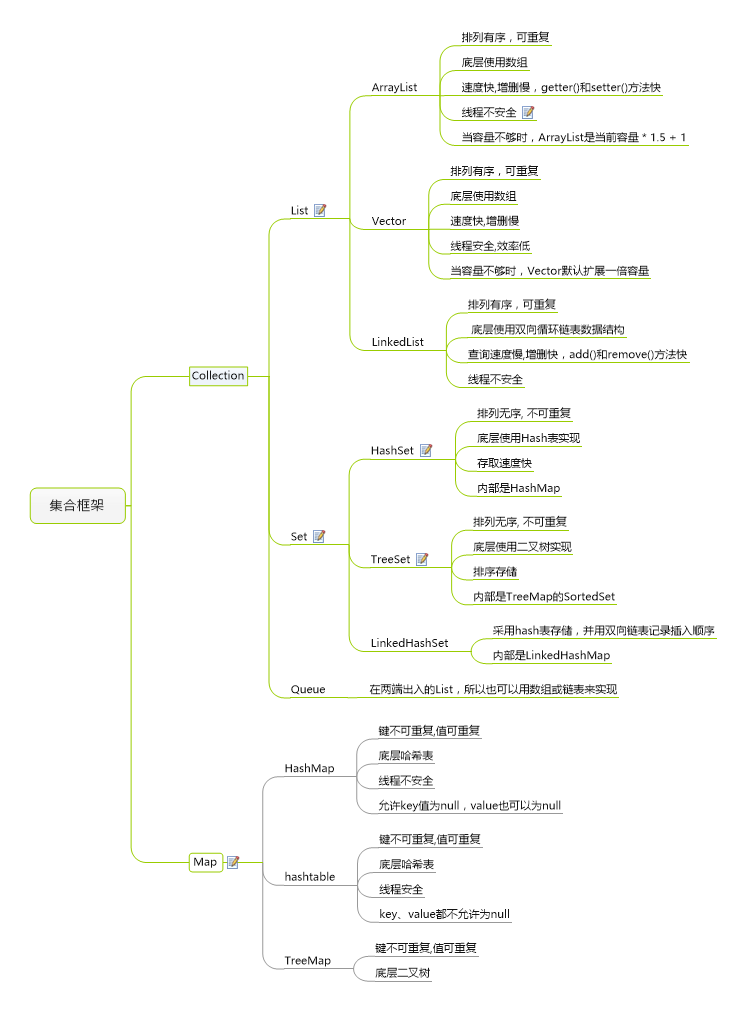
如果对你有所帮助(●ˇ∀ˇ●)点个赞或者关注下吧,没准还能打赏下(/▽\=)。你的鼓励将是博主继续写下去的动力,生活不易,且行且珍惜。